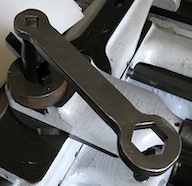
I would like to keep a wrench handy for both the 3/4" tailstock nut and the 3/8" square lantern tool post bolt. With a closed 3/4" end the wrench could hang on the tailstock for storage and be handy for use on the tool post.
I started with a 3/8" X 1 1/2" X 12" 1018 cold finish steel bar. This was cut off at 6" length with the horizontal bandsaw. Locations were marked for both holes. The larger hole was drilled up to 3/4" on the drill press.
The drill press speed is too fast for a drill bit this large.
This hole turned out slightly undersized at 0.740" and was bored to slightly oversized: 0.760". The small hole was then drilled to 3/8". A square was marked out around this hole with no measurements. A small 3-corner file was used to cut to the marked lines. It is not beautiful, but a perfect fit on the square-head tool post bolt.
For the hex hole I decided to mark out the corners of the hole. A table in "Machinery's Handbook 29th Edition" page 702 was used to define the vertices. This hole was then filed to fit the hex nut on the tailstock. This took quite a bit of filing, but again resulted in a nice fit.
The next step was to remove waste from the handle. 15 holes were chain drilled on each side of the work piece. The holes were located 1/4" in from the edge and 0.25" apart. The holes were drilled up to 15/64". After drilling all 30 holes a 3/16" end mill was used to remove the webbing from between the holes. A lot of chatter was experienced milling 0.020" per pass.
The four corners were cut off with a hacksaw and angle cuts were made into the slot left by the milling. This removed the side pieces leaving a "wrench shape", but left significant metal to be removed. A variety of files were then used to produce the final shape over the course of about 3 hours. All corners were rounded with the files as well to leave a nice feel to the wrench. The wrench was coated with a light film of oil to complete the project. This was a nice little break from the orrery.
